Next.js is a great addition over React and provides features such as 'hybrid' static web apps. While Next.js can be used to export a static site which you can host on a simple server or any cloud platform for that matter, however if you need "server side rendering", one of the options is for you to serve the app over Node.js evironment.
Azure's Static Web apps only supports the staticly generated Next.js apps thus we'll have to use Azure's App service to host a Node.js environment to get this through.
How to host Next.js app on Azure's app service
We'll achieve this with the below steps including CI/CD pipeline setups.
- Have the repository hosted in one of the supported systems
- Build an Azure App Service instance using Node.js
- Azure Pipeline will build the artifcats
- Make sure a service connection between azure devops and resources exists
- A Release pipleine will get hold of the artificats and deploy them to App service
- We'll tweak some startup commands to get the Node.Js instance recognise our app.
So, let's get started with the repository setup.
Repository setup
-
Our Next.js codebase can be pushed to any of the git repo host systems supported by Azure. In this example, I'll go with Azure Devops Repo.
-
For better maintainability purposes, I have created two different branches.
- All my changes are pushed to 'develop'
- And only with a Pull reauest is the change merged to 'main' branch.
The reason for this is so that we could set up a azure build pipeline to trigger with every change in the main branch. If you keep your usual code commits to develop branch, and only merge them to main when everything is good to go, it will keep the triggers to absolutely necessary merges to main rather than at every commit.

Azure App Service setup
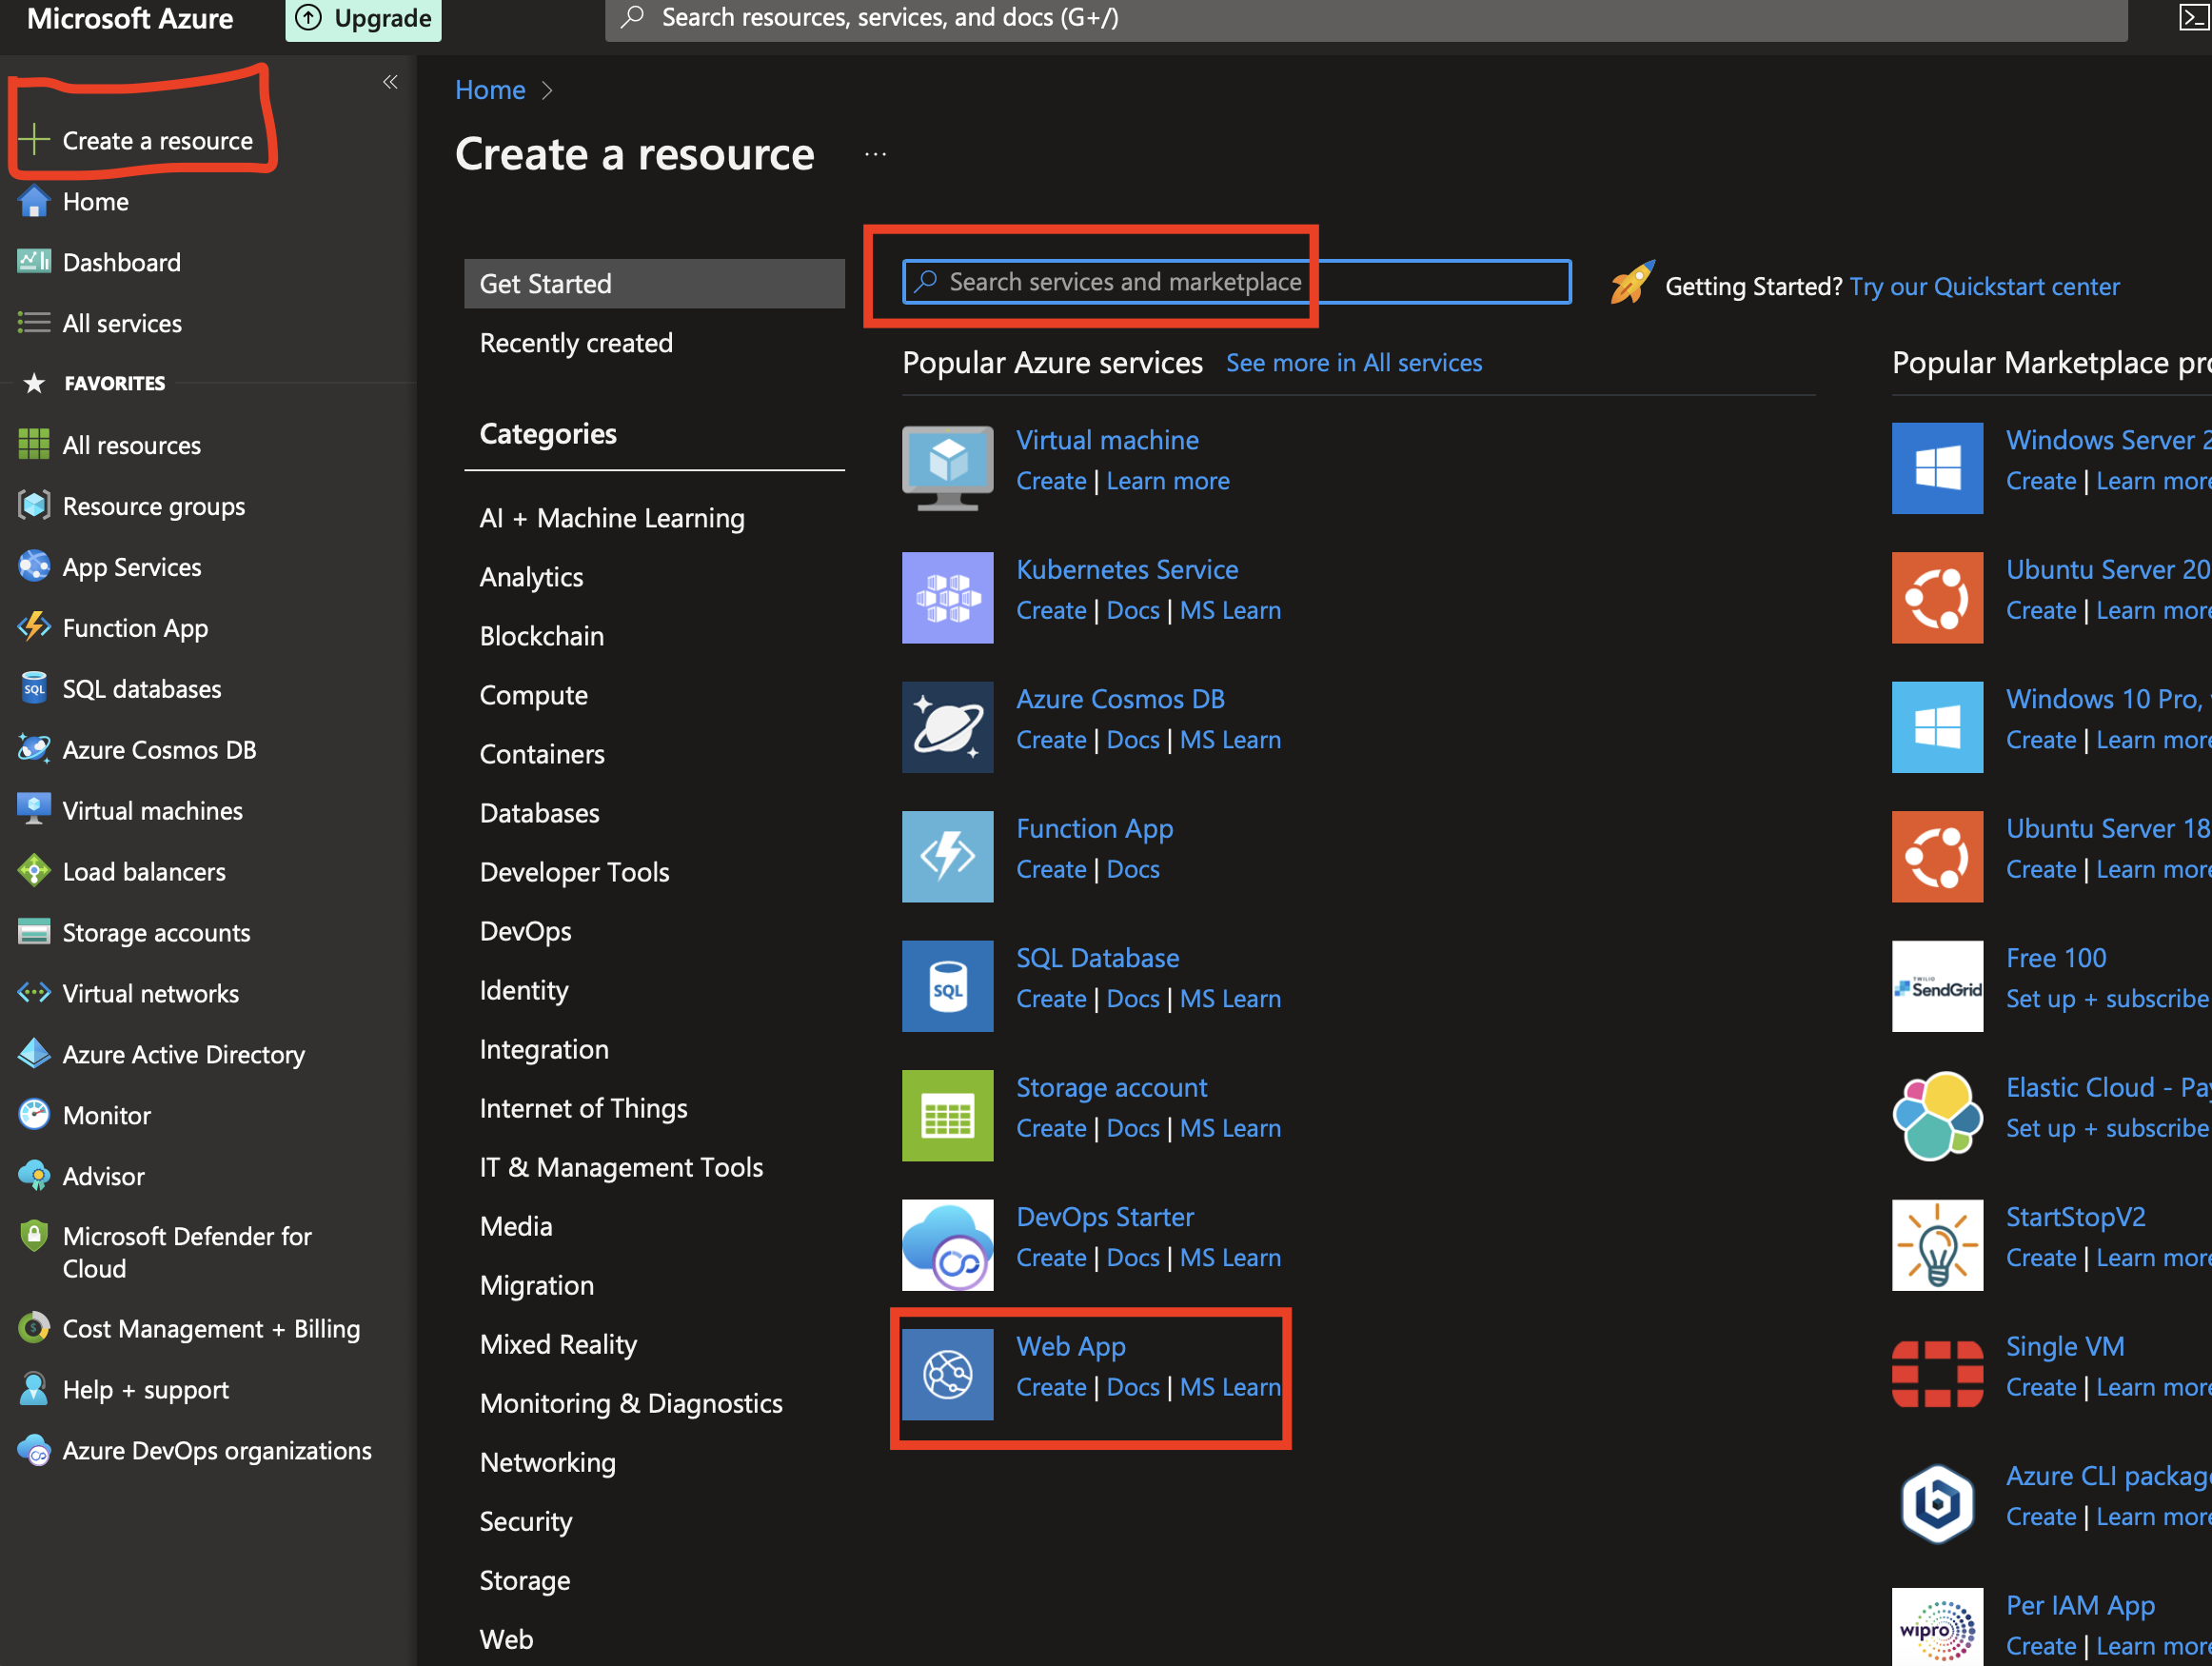
Assuming you have signed up for Azure, let's go ahead with creating a new app service.
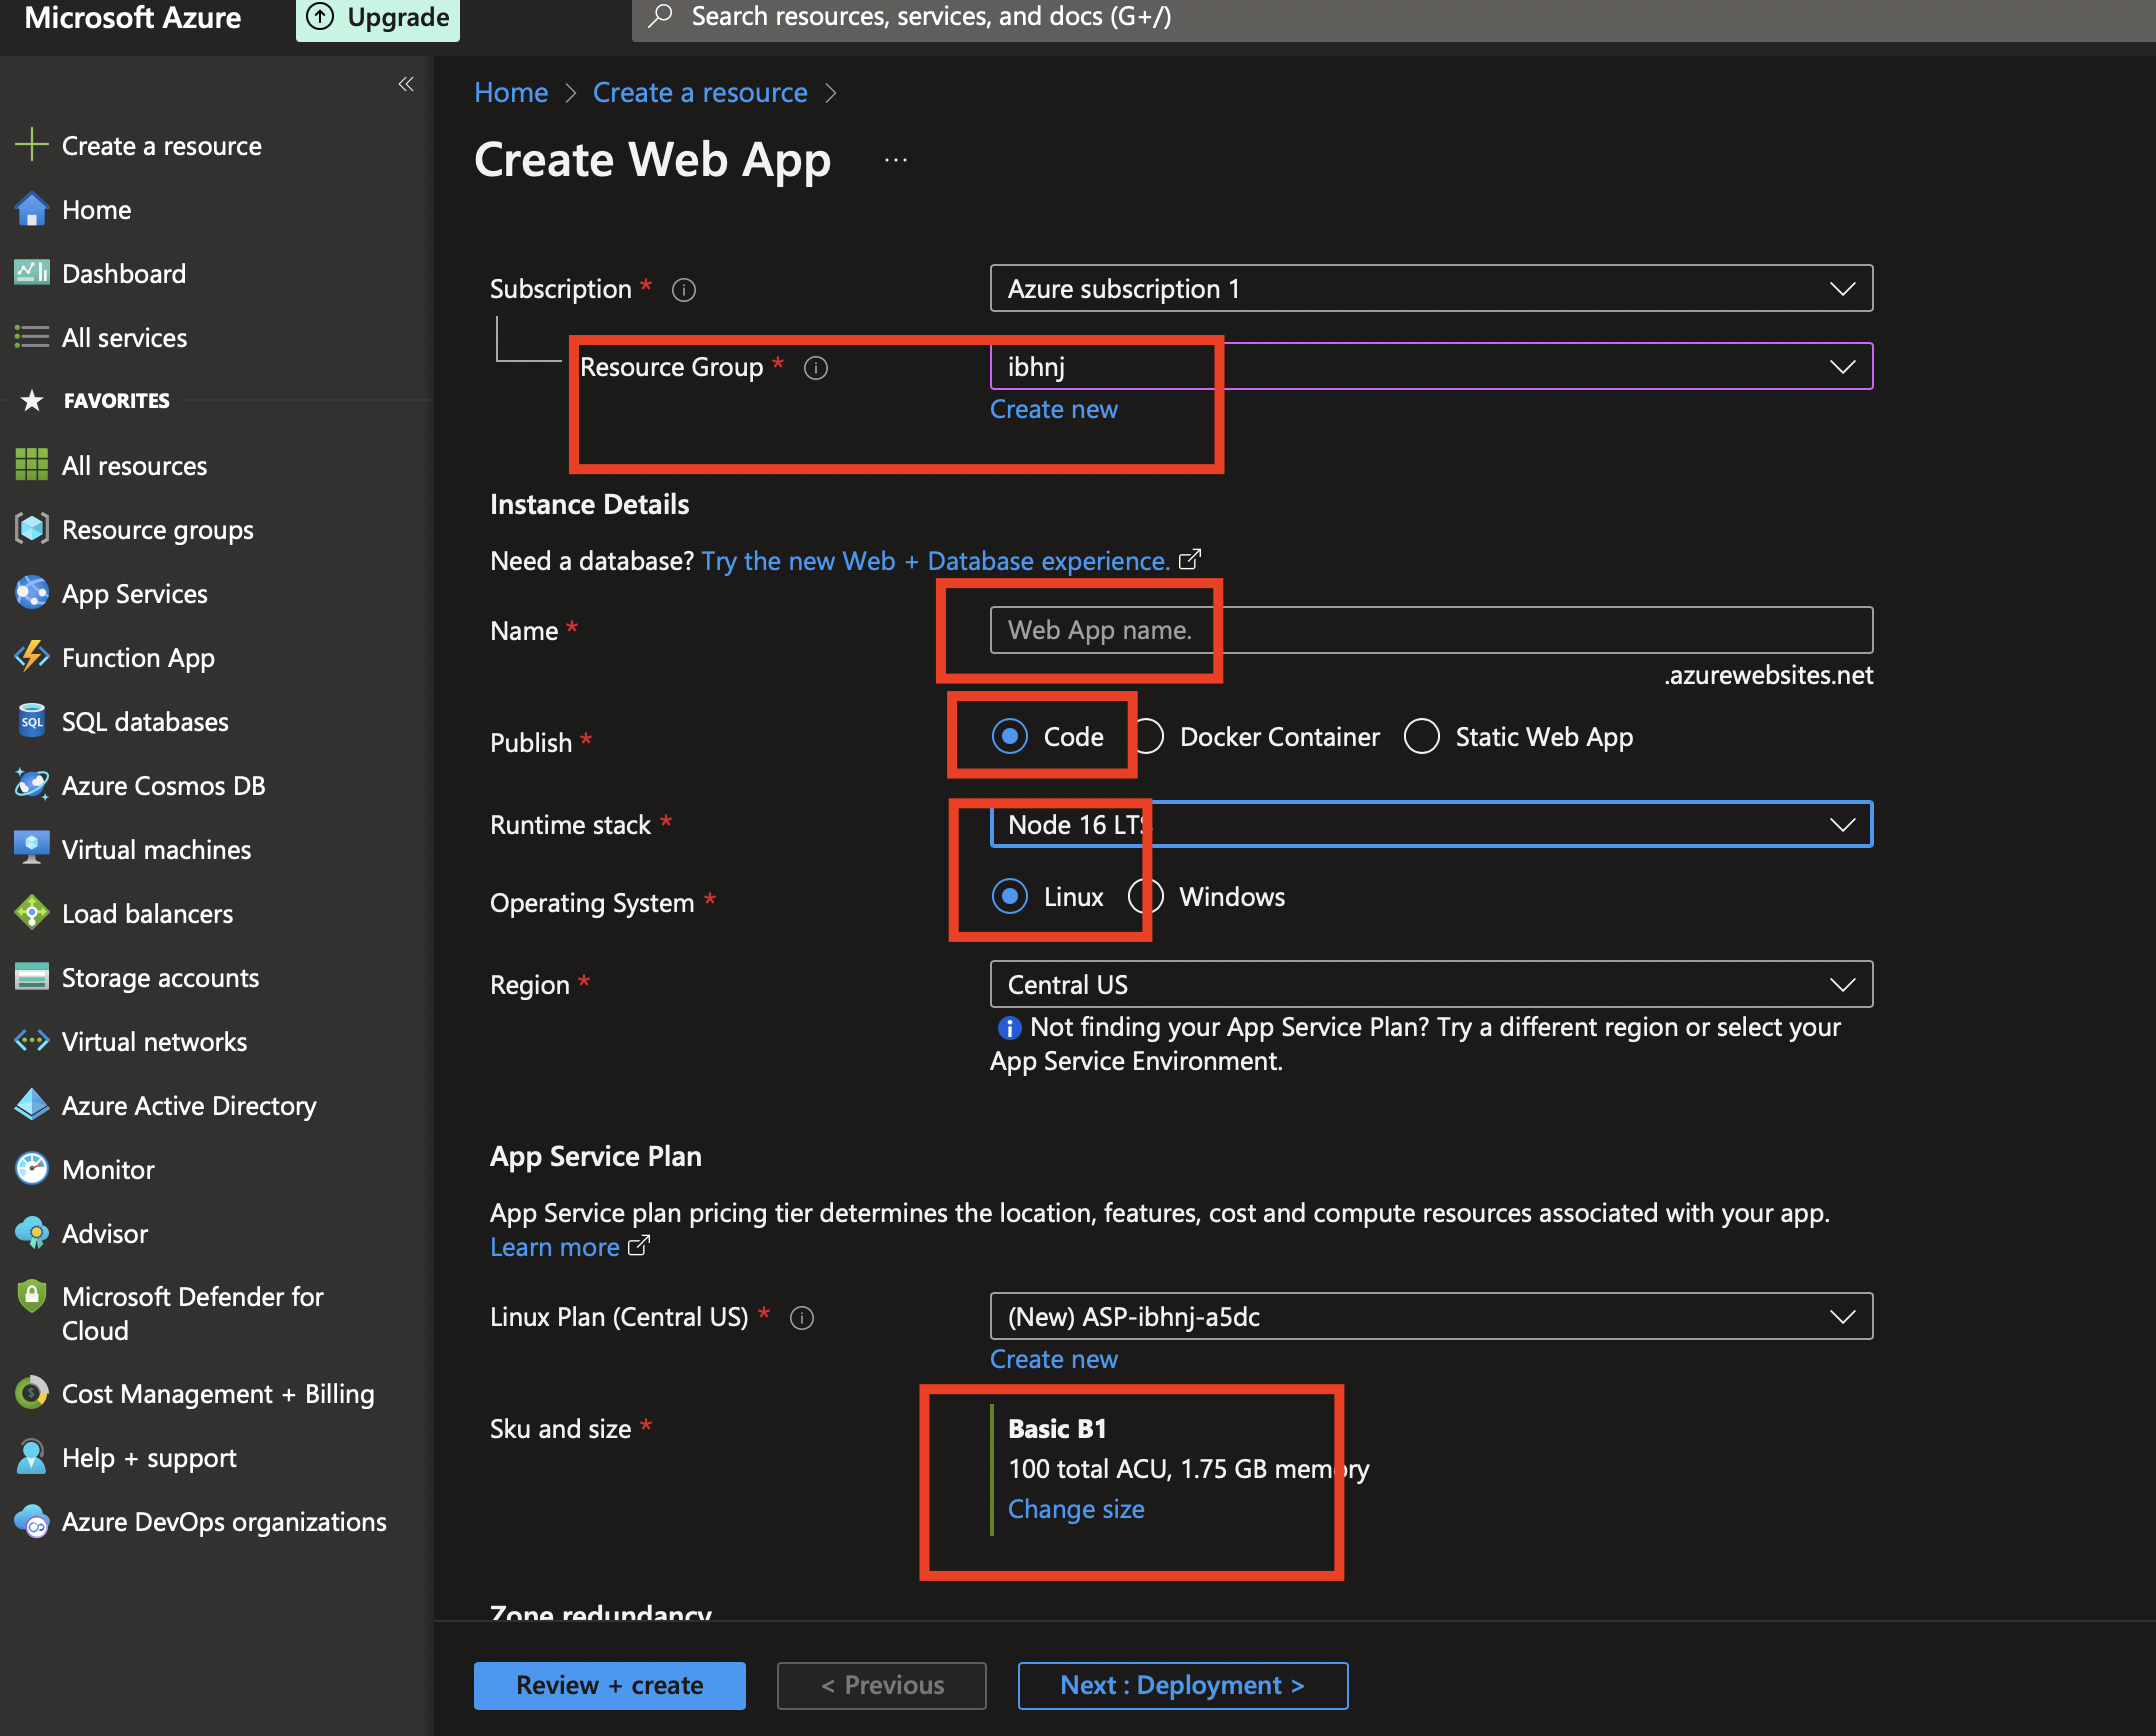
We'll begin with creating a new resource group. [ A resource group is a "group" of stuff you tag together, which you can handle in one go. Example, If I want to delete all the stuff I have created for a certain project, provided I had tagged them in the same group, I could find all of them together].

So, start by naming the resource group, providing an unique name for the instance - which will form the URL using which you can check the site later, the runtime stack would be node on a Linux operating system.
Feel free to choose any region you wish (provided the runtime and OS is available in the region) and finally selecting the SKU and size at the bottom. You may choose the free tier if this is for test purposes only.

Hit "Review + Create" and then finally "Create" on the second page. Your app service should now boot up and be avaliable on the url.
Building the Azure build pipeline
While the app service is getting ready, we can focus on building the azure "Build" pipeline. The pipeline will watch out for changes to the main branch of the repository and then trigger a build, finally producing an artificat, which we'll later push to the app service.
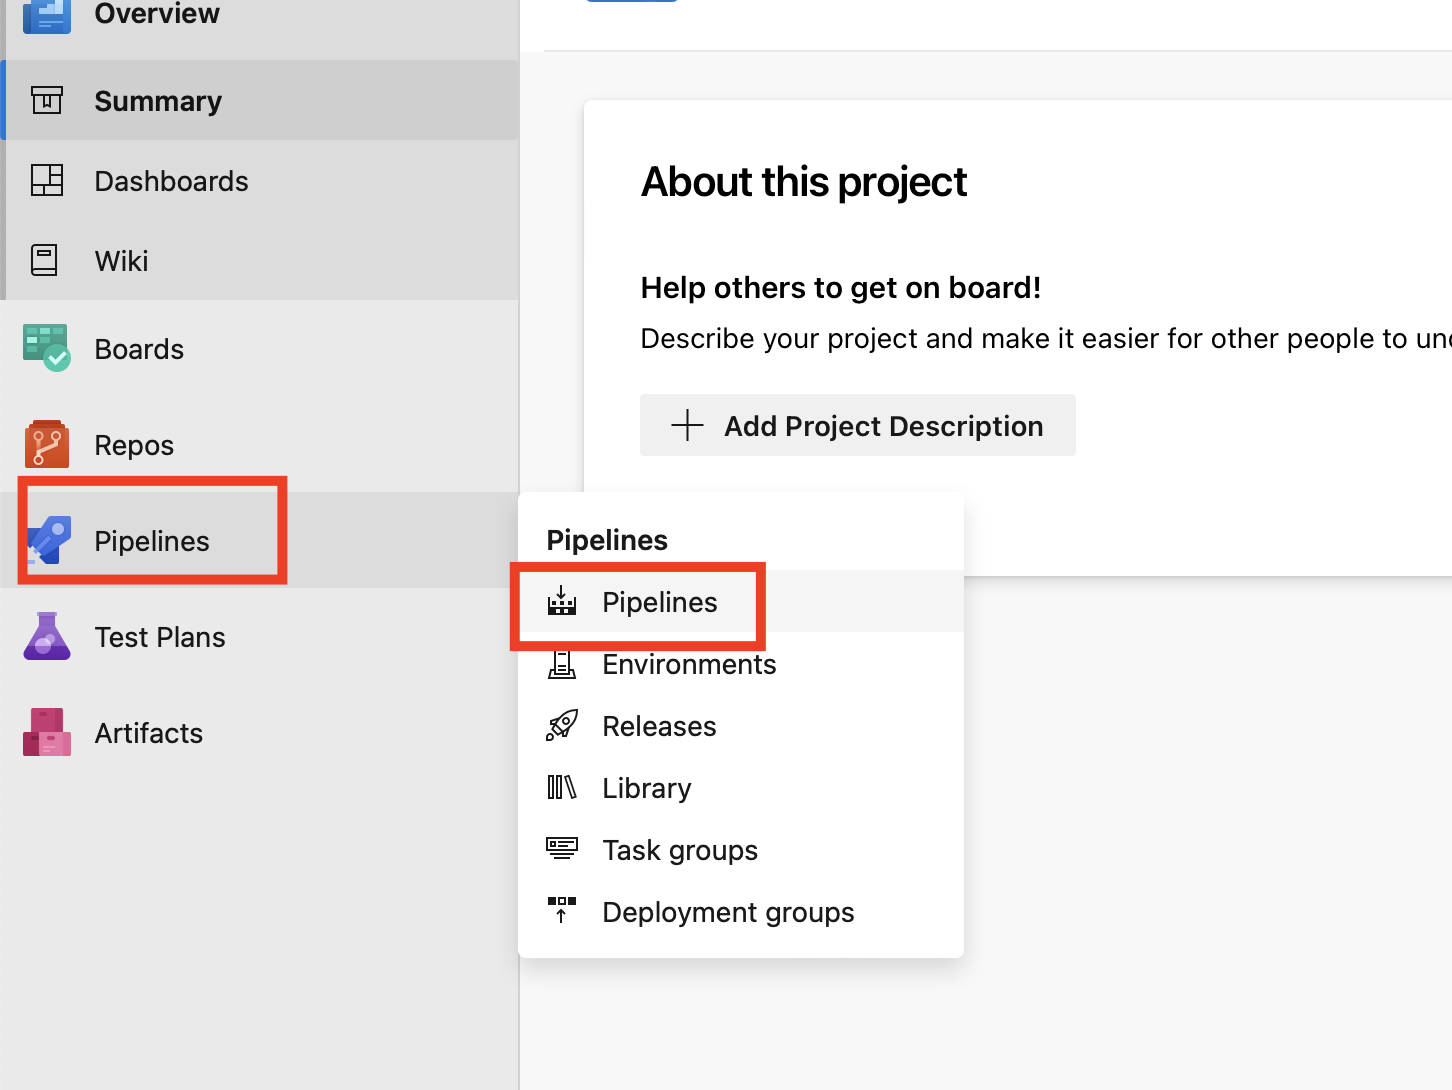
Head over to your repo and start by creating azure pipelines-> New Pipeline.

Select the appropriate options including where your code is located, the repo and then start with building the pipeline. The steps we need to add are:
- Using the linux vm pool
- Get hold of Node JS
- Install the packages
- And then run the build command to build our app
- Finally zip the result
- And then publish the artifacts.
Let's look at the yml file of our pipeline.
# Node.js
# Build a general Node.js project with npm.
# Add steps that analyze code, save build artifacts, deploy, and more:
# https://docs.microsoft.com/azure/devops/pipelines/languages/javascript

trigger:
- main

pool:
  vmImage: ubuntu-latest

steps:
- task: NodeTool@0
  inputs:
    versionSpec: '16.x'
  displayName: 'Install Node.js'

- script: |
    npm install
    npm run build
  displayName: 'npm install and build'

- task: ArchiveFiles@2
 inputs:
   rootFolderOrFile: '.'
   includeRootFolder: false
   archiveType: 'zip'
   archiveFile: '$(Build.ArtifactStagingDirectory)/$(Build.BuildId).zip'
   replaceExistingArchive: true

- task: PublishBuildArtifacts@1
 inputs:
   PathtoPublish: '$(Build.ArtifactStagingDirectory)'
   ArtifactName: 'drop'
   publishLocation: 'Container'
Here am using the ubunutu vm, to pull Node version 16, then installing all the packages mentioned in package.json, finally building the app, then zipping the directory and publishing it to an artifact named "drop".
That's all is needed for our build pipeline.
You may now save the pipline and build it to make sure everything works and you can finally see an artifact produced via the logs. Tip: At this stage, you could also download the artifact to your local drive and use npm run start to see if the site is served.
Establish Service connection
We need to connect Azure devops to our resource and hence will need a service connection.
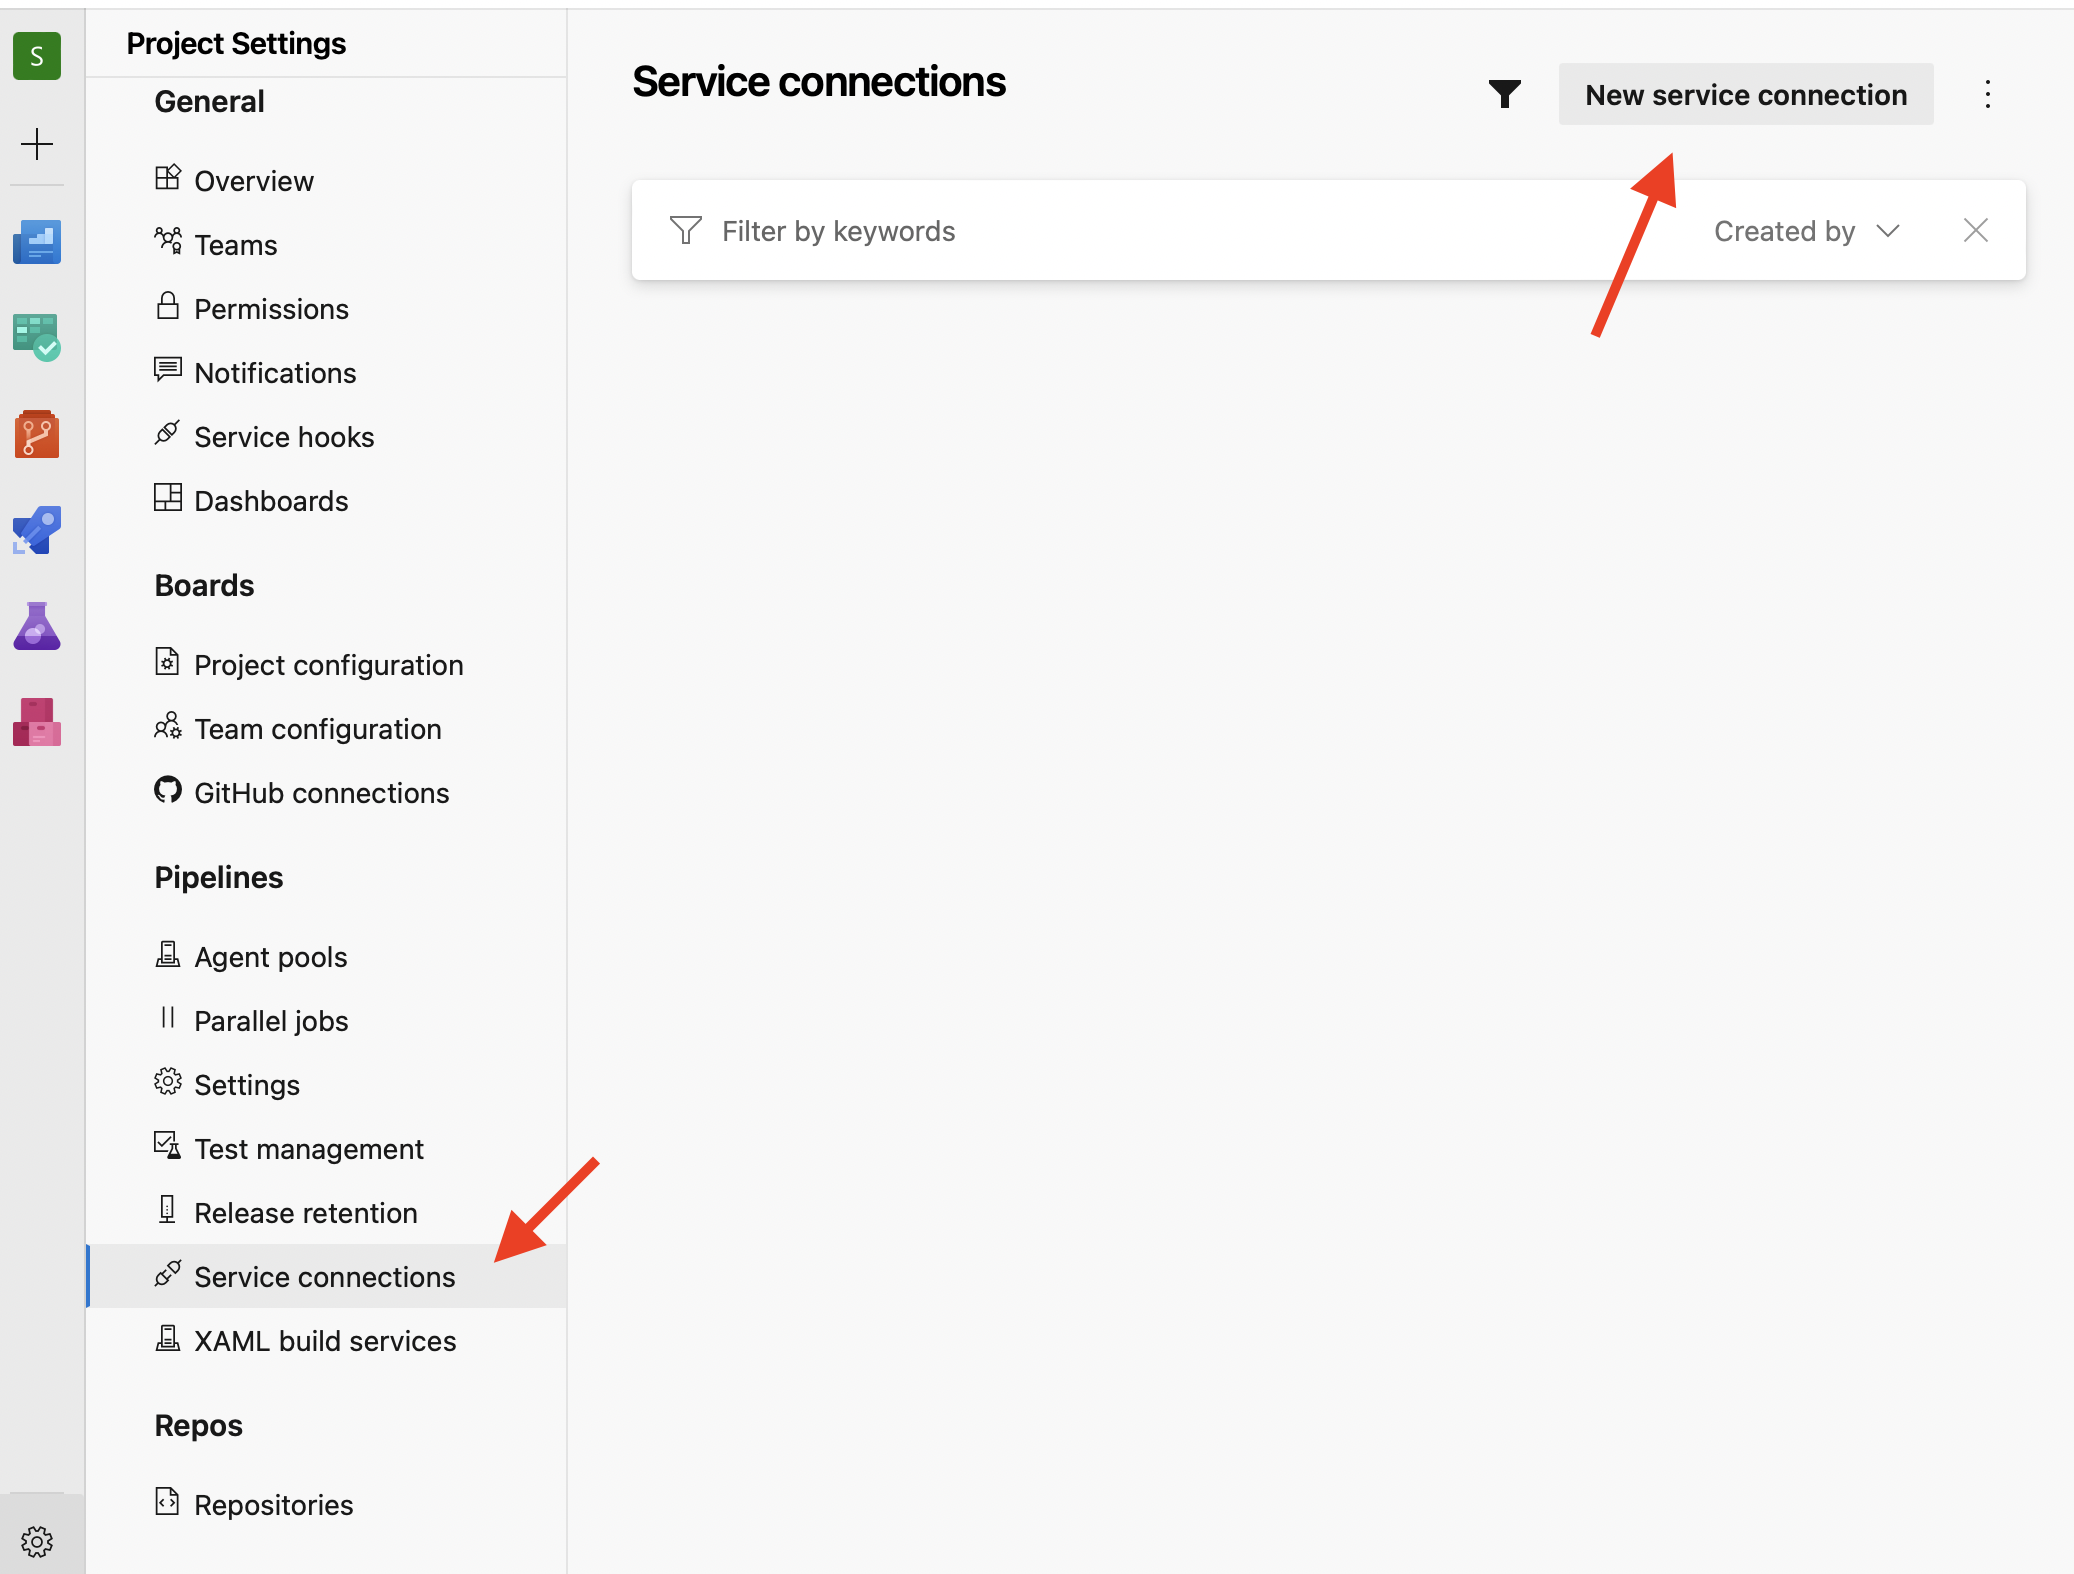
From the main menu, Choose Project Settings (at the bottom left of the screen)-> Look for Service Connections under Pipelines.

Once there, create a new service connection. Select your subscription (Authorise it if you haven't done this before), select the resource group and then finally save the connection after granting all the rights to the pipelines.
Once the connection is in, our pipelines can talk to our app service.
Building the azure Release pipeline
Now since we have our artifacts ready from build pipeline, we need to build another pipeline, that would publish this artifact to our app server.
Head down to your repo, and look for Releases on the left panel (the same area where we started with builidng pipelines). Hit New->+New Release Pipeline to get started with the "release" pipeline. Use the "Azure App Service Deployment" template from the right panel.
Click on artifact and look for the build pipeline we just had setup. Find the project, the pipleine name and add them. Now we have hold of the artifact, we need to publish it.
Under "Tasks"- look for the stage that was created for us and edit it.This is where we will provide the details of our Node app we created at the start of the tutorial.
Before you hit save, we'll need to make some special changes to the startup command.
Next.js would advise us to run "npm run start" at the start of our serve. However, since we have our Node.js app setup seperately, we'll need to make sure we map our ports.
Hence under startup command- > enter the below details.
pm2 start /home/site/wwwroot/ecosystem.config.js --no-daemon
This command looks for a special ecosystem.config.js file, which we now need to build and commit to our repo as well.
Create a new file named "ecosystem.config.js" at the root of our app and enter the below details. You may change the app name. The below script will map our ports and the script to our next app.
  module.exports = {
  apps: [
    {
      name: "app-name",
      script: "./node_modules/.bin/next",
      args: "start -p " + (process.env.PORT || 3000),
      watch: false,
      autorestart: true,
    },
  ],
  };
Commit the the above ecosystem.config.js file. Make sure to save our release pipelines, which can now find the above file.
That's all is needed to setup our release pipeline. You may also change the continous deployment trigger of this pipeline to execute everytime there's a new build- but before that's let's manually run this and check if our app deploys.
After the new commits are merged to main, our build pipeline should trigger, followed by either a manual or automated trigger of our release pipeline. After the release pipeline is done, if everything goes will, your Next.js app must be now avaiable on the Node.js server we have on our Azure app service. :)
If you find this article helpful, please consider sharing it.
